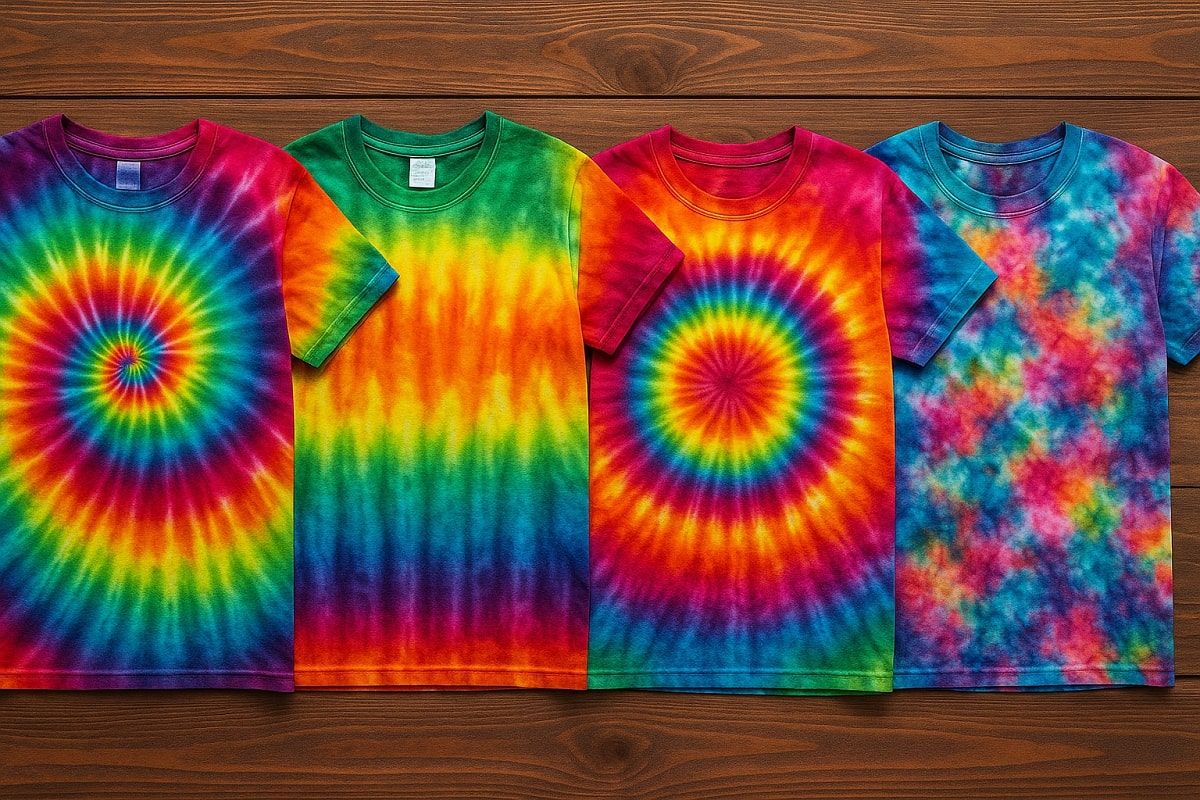
25 Easy Tie Dye Ideas for Kids: Fun and Safe DIY Projects
Tie dye is one of the most exciting and colorful activities kids can enjoy! These simple tie dye ideas are perfect for children of all ages, from preschoolers to teens. With proper supervision and kid-friendly materials, your little ones can create amazing wearable art while learning about colors, patterns, and creativity.
Table of Contents
1. Rainbow Spiral T-Shirt
Start with the classic! Help kids pinch the center of their shirt and twist it into a flat circle. Secure with rubber bands like pizza slices and let them apply rainbow colors to each section. This pattern always creates magical results that kids love.
2. Sunshine Bullseye Design
Perfect for beginners, this pattern creates beautiful rings of color. Have kids pinch their fabric at one point and wrap rubber bands down the length. Use bright yellows and oranges for a cheerful sunshine effect.
3. Heart-Shaped Tie Dye
Fold the shirt in half and draw half a heart along the fold with washable marker. Tie rubber bands along the heart outline, then let kids apply pink and red dyes for a lovely heart pattern.
4. Simple Stripes Pattern
Fold fabric accordion-style (like a paper fan) and secure with rubber bands every few inches. Kids can alternate colors between each band to create fun striped designs.
5. Polka Dot Magic
Use small rubber bands or hair ties to create tiny gathered circles all over the fabric. Kids can make each dot a different color for a playful polka dot effect.
6. Handprint Tie Dye
Place kids’ hands on the fabric and trace around them with rubber bands. The handprint areas will stay white while the rest becomes colorful – a perfect keepsake!
7. Butterfly Wings Design
Fold the shirt in half lengthwise and apply colors to one side. When unfolded, it creates a symmetrical butterfly wing pattern that amazes children.
8. Lightning Bolt Pattern
Use masking tape to create zigzag lightning bolt shapes on the fabric. Apply dye around the tape, then remove to reveal exciting lightning designs.
9. Ombre Sunset Effect
Dip different sections of the fabric into progressively lighter color baths. Start with deep orange at the bottom, then yellow, then leave the top white for a beautiful sunset gradient.
10. Flower Power Design
Gather small sections of fabric and secure tightly with rubber bands to create flower-like bursts of color. Use multiple bright colors for a garden effect.
11. Peace Sign Tie Dye
Draw a peace symbol with rubber bands and let kids apply colors around it. This retro design is perfect for teaching about colors and symbols.
12. Sports Team Colors
Use school or favorite team colors in simple patterns. Kids love wearing their team pride in unique tie dye designs.
13. Galaxy Space Theme
Use dark blues and purples with splashes of silver or white paint for stars. Kids can create their own universe on fabric!
14. Ice Cream Swirl
Apply colors in swirling motions just like ice cream flavors mixing together. Pink, mint green, and yellow work wonderfully for this sweet design.
15. Animal Print Inspiration
Create leopard spots using small rubber band circles with orange and black, or zebra stripes with black and white for wild animal themes.
16. Crayon Box Colors
Let kids choose their favorite crayon colors and apply them in blocks or sections. This is perfect for teaching color names and combinations.
17. Under the Sea Design
Use blues, greens, and teals with wave-like patterns. Add some silver or white for foam effects to create ocean scenes.
18. Emoji Face Tie Dye
Use rubber bands to create simple smiley faces or other emoji expressions. Kids love wearing their favorite emojis!
19. Marble Effect Pattern
Scrunch fabric randomly and apply different colors for a marbled appearance. This free-form technique encourages creativity and experimentation.
20. Tree Branch Design
Use tape or rubber bands to create branch-like patterns, then apply greens and browns for nature-inspired designs.
21. Mandala Circle Patterns
Create concentric circles with rubber bands and apply colors in repeating patterns. This introduces kids to symmetry and pattern concepts.
22. Superhero Colors
Use primary colors (red, blue, yellow) in bold patterns to create superhero-inspired designs that make kids feel powerful and creative.
23. Seasonal Themes
Spring pastels, summer brights, fall oranges and reds, or winter blues and whites help kids connect with the changing seasons.
24. Number and Letter Shapes
Use stencils or tape to create kids’ initials, ages, or favorite numbers in tie dye. Perfect for personalized gifts or special occasions.
25. Friendship Bracelet Colors
Use the same color combinations kids love in friendship bracelets – pinks, purples, blues, and greens in fun patterns.
Kid-Safe Materials and Setup
Essential Supplies for Children
- Non-toxic fabric dyes (Tulip or Jacquard brands are kid-friendly)
- 100% cotton items (t-shirts, socks, bandanas work best)
- Rubber gloves in child sizes
- Plastic squeeze bottles with easy-grip caps
- Large rubber bands and hair ties
- Plastic tablecloth for workspace protection
- Old clothes or aprons for kids to wear
Safety Preparations
- Adult supervision is always required
- Well-ventilated area (outdoor spaces work great)
- Eye protection for messy kids
- Easy cleanup station with soap and water nearby
- First aid kit for minor accidents
Step-by-Step Process for Kids
1. Preparation Phase
- Help kids put on old clothes and gloves
- Set up workspace with plastic covering
- Pre-wash items to remove any sizing
- Have kids choose their colors and patterns
2. Pattern Creation
- Show kids how to fold, twist, or tie their chosen pattern
- Let them practice on paper towels first
- Secure patterns with rubber bands (adult help may be needed)
- Double-check that ties are tight enough
3. Color Application
- Mix dyes according to package directions (adult task)
- Show kids how to squeeze bottles gently
- Let them apply colors to their designated areas
- Encourage creativity while maintaining pattern structure
4. Processing and Cleanup
- Wrap finished pieces in plastic bags
- Let kids help clean up their workspace
- Wait 6-8 hours for colors to set
- Rinse and wash items (adult supervision required)
Educational Benefits for Children
1. Color Theory Learning
Kids naturally learn about primary and secondary colors, how colors mix, and which combinations work well together.
2. Pattern Recognition
Creating repeating patterns helps develop mathematical thinking and spatial awareness skills.
3. Following Instructions
Tie dye projects teach kids to follow multi-step processes and understand sequence and order.
4. Fine Motor Skills
Tying, squeezing bottles, and manipulating fabric helps develop hand-eye coordination and dexterity.
5. Creativity and Self-Expression
Kids learn there’s no “wrong” way to be creative and gain confidence in their artistic abilities.
Age-Appropriate Modifications
Ages 3-5 (Preschool)
- Simple patterns like dots or stripes
- Large motor movements
- Focus on color recognition
- Heavy adult assistance with tying and dye mixing
Ages 6-8 (Elementary)
- Introduction to more complex patterns
- Beginning independence with squeezing bottles
- Learning about color mixing
- Following simple instructions
Ages 9-12 (Middle School)
- Complex geometric patterns
- Understanding of color theory
- Planning their own designs
- Teaching younger children
Ages 13+ (Teens)
- Advanced techniques like ice dye
- Creating their own color combinations
- Designing custom patterns
- Potential entrepreneurial projects
Party and Group Activity Ideas
1. Birthday Party Tie Dye Station
Set up multiple stations with different patterns so party guests can rotate and try various techniques.
2. Summer Camp Projects
Create camp t-shirts that kids can wear throughout the session and take home as memories.
3. Scout Badge Activities
Tie dye projects can fulfill arts and crafts requirements for various scouting organizations.
4. School Fundraising Events
Kids can create tie dye items to sell at school fairs or fundraising events.
5. Family Reunion Activities
Multi-generational tie dye sessions create lasting memories and matching family items.
Troubleshooting Common Kid Issues
1. Colors Too Light
Usually happens when kids are hesitant to use enough dye. Encourage them to be generous with color application.
2. Muddy Results
Occurs when complementary colors mix. Teach kids about color separation and provide barriers.
3. Uneven Patterns
Often from loose tying. Adults should double-check all rubber band placement before dye application.
4. Impatience with Process
Kids want instant results! Explain the “magic happens while we wait” and plan other activities during processing time.
5. Fear of Mess
Some kids worry about getting dirty. Reassure them that mess is part of the fun and everything is washable.
Seasonal Project Ideas
Spring Activities
- Easter egg colors – pastels in simple patterns
- Flower garden themes – multiple bright colors in organic shapes
- Rain cloud designs – blues and grays with silver accents
Summer Fun
- Beach themes – ocean colors with sandy browns
- Popsicle colors – bright, fun color combinations
- Camping gear – bandanas and t-shirts for outdoor adventures
Fall Projects
- Autumn leaf colors – oranges, reds, and yellows
- Halloween themes – orange and black combinations
- Back-to-school – school colors or favorite color combinations
Winter Crafts
- Snowflake patterns – blues and whites in geometric designs
- Holiday colors – traditional red and green combinations
- New Year themes – metallic colors and star patterns
Frequently Asked Questions (FAQs)
1. What age is appropriate for kids to start tie dyeing?
Children as young as 3 can participate in tie dye with heavy adult supervision. Preschoolers can help with simple tasks like choosing colors and squeezing bottles, while older kids can handle more complex patterns independently.
2. Is tie dye safe for children?
Yes, when using non-toxic, kid-friendly dyes and proper safety measures. Always ensure adult supervision, use gloves, work in ventilated areas, and keep dyes away from eyes and mouth.
3. How long does the tie dye process take with kids?
Plan for 2-3 hours total: 30 minutes setup, 1 hour for creating and applying dye, 30 minutes cleanup, then 6-8 hours waiting time. Kids can do other activities while their projects process.
4. What’s the best fabric for kids’ tie dye projects?
100% cotton t-shirts, socks, and bandanas work best. Avoid synthetic blends as they don’t absorb dye well. Pre-washed cotton produces the most vibrant, lasting colors.
5. Can we do tie dye indoors?
While possible, outdoor spaces are ideal for kids’ tie dye projects. If indoors, ensure excellent ventilation, protect all surfaces with plastic, and have easy access to water for cleanup.
6. How do I prevent kids from making muddy colors?
Teach basic color theory – explain that opposite colors (like red and green) make brown when mixed. Provide color wheels and encourage kids to choose colors that are next to each other.
7. What should kids wear during tie dye activities?
Old clothes they can get messy, closed-toe shoes, and rubber gloves. Consider having them wear aprons or smocks over their clothes for extra protection.
8. How do we clean up after tie dyeing?
Have a cleanup station ready with soap, water, and towels. Clean hands first, then surfaces. Most dyes wash out of skin easily but may stain surfaces, so immediate cleanup is important.
9. Can kids tie dye items other than clothing?
Absolutely! Pillowcases, tote bags, bandanas, socks, and even coffee filters make great tie dye projects. Just ensure the material is natural fiber for best results.
10. How do I preserve kids’ tie dye creations?
Wash finished items separately in cold water for the first few washes. Use gentle detergent and avoid bleach. Air dry when possible to prevent fading and preserve the vibrant colors kids worked so hard to create.